

Inbox Zero

Email overload got you down? You’re not alone. Without proper systems and processes in place to manage your inbox, overwhelm is not only likely but almost guaranteed.
Achieving an inbox where you have no emails (i.e. Inbox Zero) is no doubt the holy grail of email management, but I’m here to show you that it is exponentially easier to achieve than actually finding the Holy Grail.
As a consultant, I’ve walked my clients through how to reduce their Gmail inboxes from 80,000+ emails to zero in just a few hours, all while setting up the workflow to keep this number down for good.
If you are following the COVID19 #StayHome orders, now is an excellent time to get on top of your inbox and ahead of the game before your world starts back up. This article is a DIY version of the training I give to my clients for those who want to learn Inbox Zero themselves.
You can also join my free live 1-hour Inbox Zero training over Zoom on Monday, May 18, 2020 at 11:00 am. SIGN UP HERE.
Note that this article is written with specific instructions for Gmail, but basic principles could be translated to other programs at the reader’s discretion.
Gamification of Email
Most people end up in email overwhelm because they watch all of the emails come into their inbox and don’t take action on them. Emails pile up until you have 108,349 emails and are in a state of consistent overwhelm. Every time you go into your inbox and your brain registers your 108,349 emails, you use up valuable mental space processing the queue, beating yourself up for having too many, and trying to catch what you can before it disappears into the “great beyond” (or page 2!). This is NO way to live.
I find it’s helpful to think about EMAIL like TENNIS. Pretend you are a tennis player standing on the court facing a tennis-ball machine, which automatically deploys a tennis ball your way every 10 seconds. These balls are like emails hitting your inbox and your job is to hit all of these balls. If you don’t, they will fall at your feet and eventually you will become buried in a mountain of tennis balls. If you are reading this, then I imagine that’s what your current inbox feels like, right?
Don’t worry, I’m not suggesting that you respond to every email as it comes in. The purpose of this training is to show you set up automated systems so that the only emails that end up in your inbox are those that represent immediate action items. The five systems and practices that can help with this are: Archiving, Folders/Filters, Unsubscribing, Snoozing, Scheduling.
Preparation
Before I go over how to set each one up, I recommend that you configure your Inbox density to Compact to help with batch sorting and configure your inbox to just the primary inbox to simplify your view. Here is how:
Set Email Density
Go to your Gmail Inbox
Click the “Settings” wheel in the top right-hand corner
Click “Display Density”
Set to “Compact” and click “Ok”
Configure Inbox
Gmail offers the option to sort your inbox into different categories like “Promotions” and “Social.” I have found that it works best and more efficiently to create your filters for your inbox. If this is working well for you then the more power to you, but for the sake of this training I would recommend that you remove all categories except “Primary” before you proceed.
Click on the “Settings” wheel in the top right of your inbox
Select “Configure Inbox”
Uncheck all options but “Primary” and return to inbox
Okay, now you’re ready, let’s get started.
1. Archiving
Archiving Your Inbox
Now that all of your repetitive correspondence is pulled out of your inbox, it’s time to deal with what’s left. The perfect moment to talk about your “Inbox” versus “All Mail.” If you go into the left sidebar of your inbox, you will see that there is an item called All Mail. This is where ALL your email (except that which you have deleted) is kept in chronological order. It includes everything in your inbox and in your label folders. The way that you get an email out of your inbox without deleting it is by archiving it to all mail. Each email is searchable from the search box by name, date, and other criteria if you ever need to go back and find something you archived.
Archiving what remains in your inbox after you set up your filters and labels will require that you have some real talk with yourself about what you were actually planning on following up with and what you were realistically never going back to again.
I recommend picking an “Email Forgiveness Date” (maybe 1–2 months ago) and giving yourself a free pass on responding to anything that is in your inbox from before that date. Because let’s face it, you probably aren’t going to do it anyway. Here’s how to archive all that mail:
Use the arrows in the top right corner of your inbox to scroll back in time to the oldest page.
Select all of the email on this page (there is a checkbox above the column of checkboxes to “Select All”)

Click the “archive” button (downward facing arrow) in the toolbar
Refresh your inbox to see that all of this mail has been removed from your inbox and put into All Mail.
Repeat this for each page of email until you are down to the date you selected.
When you get to your Email Forgiveness Date, start looking through the emails individually and delete, filter, or archive anything that doesn’t need action
This will leave only the emails that require action from you in your inbox, transforming your inbox from a general mailroom to a chronologically organized to-do list that you can tend to at your next email session.
Enabling “Send & Archive”
To prevent buildup of email in your inbox in the future, you want to enable a setting called “Send & Archive.” Right now when you respond to something, it will just sit in your inbox. By enabling “Send & Archive” it moves the email that you responded to into “All Mail” automatically. I know what you’re thinking and don’t worry, when the person responds, it will show back up in your inbox as new unread mail.
Go to Settings
Scroll down in the first tab which is called General
Select “Show Send & Archive in reply”
Click Save

Now when you go to send an email, the primary blue “Send” button will automatically archive the email after it’s sent. If you’d like to send it and leave it in your inbox, there is a white secondary send button to the right of the blue one that allows you to do this.
2. Filters & Labels
The first thing we want to do is set up a series of filters and labels to automatically sort your email so that you can handle content in categories.
While the names and types of filters and labels you create are at your discretion, I recommend you start one called “Mailing Lists” which is a catch-all for any email newsletter you are subscribed to. This may include promotions from big companies like Target, newsletters from your favorite non-profit, and updates from your friend’s business that you want to stay subscribed to but don’t need to see every week or day or hour.., etc.
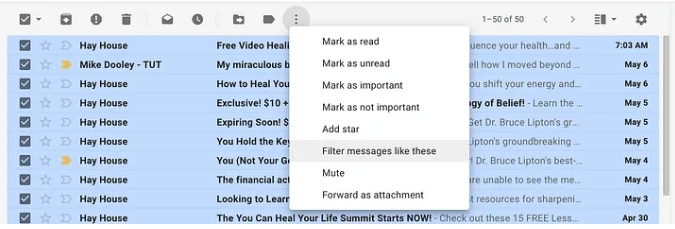
Go into your inbox and select the checkbox next to all emails on the first page of your inbox that meet the criteria above
Click the “More” icon (three vertical dots) in the toolbar above your inbox and select “Filter Messages Like These”
1. This will cause a dropdown menu to pop up from your search bar and automatically refresh your inbox with all emails that look like these. You can edit what is in the different fields to determine the criteria that will be used to filter the emails.
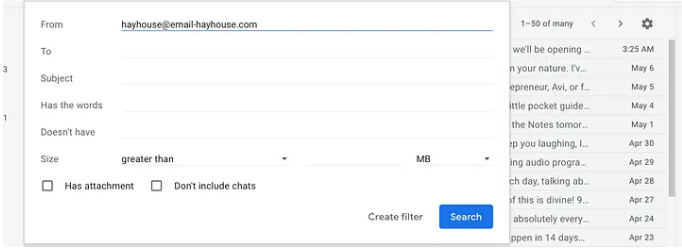
Click “Create Filter”
Select the following 4 criteria: 1) Skip the Inbox (Archive it), 2) Apply the label “Mailing Lists” (create new if needed), 3) Select Never send it to spam, and 4) Select “Also apply to XX matching conversations”
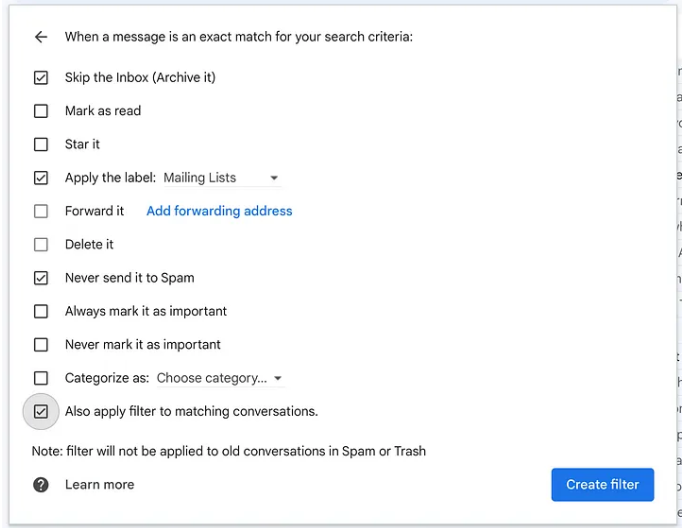
1. Click “Create filter”
This effectively pulls all of the emails that match these criteria out of your inbox and into that label’s folder in your sidebar. You can visit this folder if and when you want to and have time, but these emails will no longer take up the valuable real estate of your primary inbox.
Repeat the steps above for other categories that apply to your situation in particular, such as news/media alerts, social media notifications, receipts (use the filter criteria: contains the word “your receipt”), list serves, etc.
Pro Tips: You can also set up filters for email addresses related to specific clients, projects, or family members. For important folders that you want to see whenever new incoming mail is received, go into Settings -> Labels and select “Show when unread” for that label. This will push it to the top of your sidebar when it is unread.

As an additional step, you can “hide” certain labels (like “Mailing Lists”) that you don’t want to see daily. This works for categories that you might want to check once a month on your own (like newsletters, promotions, etc.) These hidden labels will still live on your left sidebar but they will just be below the fold of what is visible.
The filtering and labeling tool is powerful and can pull thousands of backlogged emails out of your inbox and into their proper place in the label folders. This way of batch editing your email will do a majority of the work for you with minimal effort. And, if set up strategically, will do all of the work of organizing your email for you in the future.
NOTE: If you ever delete the label, make sure you also delete the corresponding filter, otherwise those emails will go straight to all mail without gathering in a label (so you’ll essentially miss them).
3. Unsubscribing & Deleting
After you have all of your email filtered and neatly organized into labeled folders, I encourage you to get real about what emails you want to give space to in your inbox and which you can unsubscribe from or delete.
Unsubscribing
Go into your label filters and look at what’s there. Do you want to stay subscribed to everything? If no, unsubscribe immediately to save yourself future time. The unsubscribe link is usually located at the bottom of the email newsletter.
Deleting
When it comes to mailing lists and newsletters, realistically the chances are you won’t r back to anything further back than a few months. Every few months or so I recommend going in and batch deleting all the emails in this entire folder to keep your inbox down in size. Just make sure that you still want to be subscribed to everything that you were deleting, otherwise go back a step and unsubscribe from it first to prevent future emails.
4. Snoozing
The “Snooze” function is the new best friend for those who want to save for tomorrow what they can’t get to today. Assuming that your inbox is now down to only your action items that need to be tended to, I recommend that at the end of each day you “snooze” the remaining email until your next email session tomorrow. You can also use this email for items that you want to pop up at any point in time further in the future, such as for a subscription you want to remember to cancel or a friend to follow up with.
Select the checkbox next to the desired email(s)
Click the clock icon in the toolbar above your email
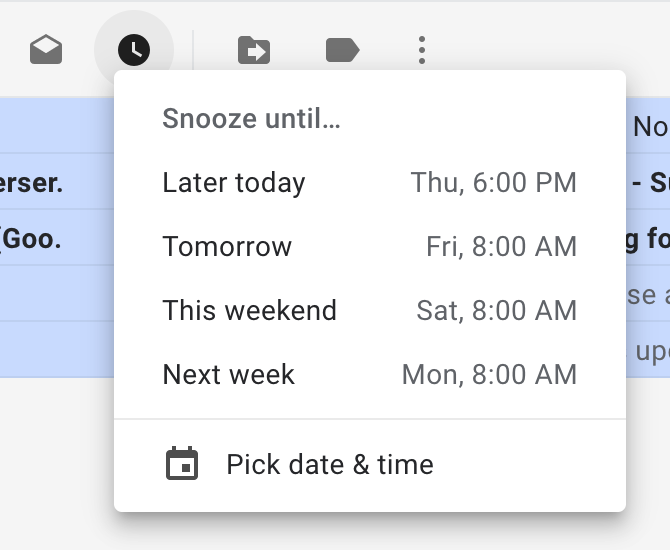
Select the date and time
The email will disappear from your inbox and now show up in the left sidebar toolbar called “Snoozed.”
From here, it will magically appear in your inbox at the date and time you picked.
Once you’re done working for the day, I recommend snoozing everything in your inbox to give yourself the Inbox Zero you deserve.

5. Scheduling
The final tool I recommend for mitigating email madness has to do with controlling when your responses go out. Writing emails now and scheduling them to be sent at a later date and time in the future can help you control the speed at which new emails are generated.
For example, let’s say that you want to finish up a client project on Friday night and get it out of your head before the weekend. But, you don’t want them to receive the email until Monday, otherwise you’ll feel obligated to respond over the weekend.
Using the scheduling tool, you can write an email now and then pick a later time and date for it to automatically send while you are off doing something else in the real world.
Compose a new email, including the “to” field and the contents of the email.
Rather than clicking “send” click the down arrow on the right side of the send button.
Select “Schedule send” in the box that pops up.


Pick the date and time from the list suggested, or click “Pick Date & Time” at the bottom of the pop-up menu to suggest a date and time not suggested.
After you schedule it to be sent later, a notification will pop up in the bottom left of your inbox confirming and showing your “Scheduled” selection.
If you need to cancel or reschedule the scheduled email, go into the Scheduled section in the sidebar on the left, select the email and click “Cancel Send. This will return it to a draft form and allow you to send it now or schedule it for a different time in the future.
And…there you have it!
I leave you with one wish:
Live well, and Inbox Zero often.